

I’ve had a GiSTEQ PhotoTrackr since March (Monica bought it for me a birthday present) and I’ve been fond of it ever since. The little GPS device fits in a pocket rather nicely, and tracks points as you walk around.
Sometimes however I’ve found that when it’s in the pocket or in the backpack when hiking, it loses it’s connection and we end up with gaps in the GPS coords. It’s not the end of the world, but a quick hack was in order.
I had a vague recollection of news from PMA 2007 of JOBO’s PhotoGPS which mounted on the flash shoe. This seemed like a clever idea and I considered this easily addressable with the PhotoTrackr. We don’t use an on camera flash or the shoe for the type of photography we do, so this would work nicely.
Make no mistake this is an easy hack that doesn’t require a lot time or effort. However, as my standard disclaimer if you destroy you’re camera/flash/phototrackr/self, I am not responsible, yada, yada, yada. You all know the drill.
Things you’ll need: Old shoe mounted flash you don’t mind destroying, hacksaw/jigsaw/cutting implement, sand paper, clamp, glue (I’ve had good results with Gorilla Glue)
Total time: Takes 15 minutes to assemble, let glue dry for at least 24 hours

Step 1: You’re going to need an old flash. We happen to have quite a few of them (seems like every old camera comes with a shoe mounted flash), and low and behold a non-working Vivitar 51 became the object of slight re-configuration. I took a jigsaw and cut off the flash foot, removed the old wired connection, leaving only a small plastic piece that if you didn’t know what it was would end up in the trash.
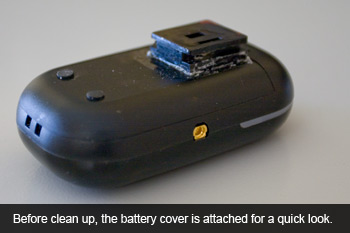
 __Step 2: __Using a bit of Gorilla Glue and a clamp, I attached said foot to the base of the PhotoTrackr battery cover plate. I positioned it such that the PhotoTrackr would be hover over the viewfinder box of our DSLR’s. I let this arrangement sit clamped overnight to make sure the glue was well set.
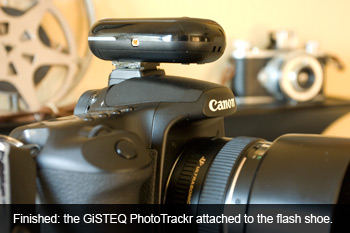
Step 3: Clean off a bit of excess glue, put battery cover back on the PhotoTrackr, put on DSLR, and you’re ready to go!
Did I mention this wasn’t rocket science? It’s a pretty simple hack, and while I couldn’t find anyone who had previously completed a similar hack with the PhotoTrackr, I’m sure someone out there has done the same. Improvements could be made (locking nut for tighter fit on the flash shoe for instance) but otherwise the PhotoTrackr is just the right size for the top of the Canon 40D (I can’t speak to other DSLR’s).
As part two of this hack, if you have an old hot shoe lying around, you could easily attach said hotshoe to the side of your monitor and just slide your newly case-modded PhotoTrackr to the side of your monitor for storage (it’s on my list to do this evening).
An even better idea would be a molded option which would just replace the existing battery back. If I had the time, I’d probably do that as a cleaner option. But in the mean time, this will do nicely.