

As we were prepping for our honeymoon to French Polynesia, we picked up an Asus Eee PC 901 along with external drives to be able to pull the CF cards from the two digital cameras we were carrying. We were pressed for time so we used the stock Windows XP Home install the machine came with and it worked okay. Performance wasn’t great, but it served its purpose.
#! CrunchBang Linux is based on Ubuntu, and “is highly customisable [sic] and provides a modern, full-featured GNU/Linux system without sacrificing performance.” Originally in the 08.x series, they had a version specific to the Eee pc called Cruncheee, but with the latest 09.x builds, you no longer need to use the Eee specific version (the 09.04.01 kernel supports the 901 hardware out of the box). I had read so many good things about the speed that I couldn’t resist giving it a go.
Setting up 09.04.01 on the Eee 901 isn’t terribly hard. You’ll need at least a 1GB USB key, or an equivalent SD card. I used a 1GB Sandisk card without issue. There are a lot of guides out, but this article offers the simplest instructions in my opinion. I used the 32-bit Lite version of 09.04.01 for my install (it offers a lot less preinstalled). For a description of what is and isn’t included in the various versions, have a look at the wiki’s application page.
The Guess: Black screen or busybox prompt on Live boot
Once you have your SD card or USB key ready, simply insert and hold down the ESC key while booting the Eee. A menu will appear and then pick your boot target (it’s usually the third option down beneath the hard drives). Shortly there after, select either default or live from the Crunchbang boot menu that appears. And then you might hit your first speed bump.
I tried every option on the list, but couldn’t get it to boot to Live mode. I’d either end up with a black screen, or at a busybox prompt. After reading lots of forum posts about similar problems with the 901 I couldn’t find a definitive solution. What I ended up doing was selecting Live, hitting tab, and removing the quiet splash option from the command and hitting enter. After doing that, I booted into Live mode without issue.
I can only guess why that worked, but installing was simple (a right click away and you’ll see a menu item called “Install CrunchBang Linux"). I setup mine on the second hard drive and left the Windows XP Home install intact (mostly to see if it would work, which it did). I never saw the black screen or the busybox command prompt again. It’s a mystery.
To the tips!
The following tips I’ve sort of rounded up from various places so that you don’t have to. I give credit where credit is due.
Tip #1: Better control with eee-control
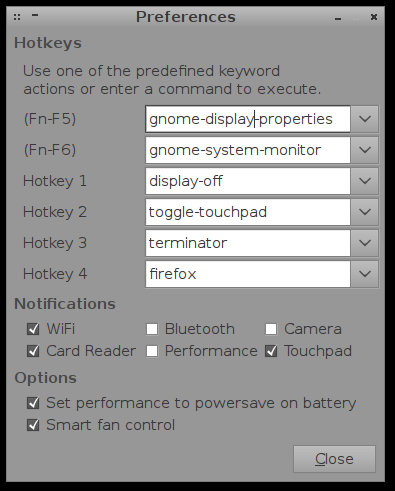
eee-control lets you control both the hardware toogles (for wifi, bluetooth, et cetera) as well as the function keys (for controlling things like brightness). It also allows you to set the hard silver keys above the keyboard to whatever application launch or toggle you wish. It’s a very slick application and is a must have for the 901.
Since it doesn’t come stock with version 09.04.01, we need to go get a file an install. If you’re used to apt-get, you can probably find it on one of the many repositories. But since I was looking for the latest and greatest version I went directly to the source. Grigori Goronzy did some great work, so have a look around his site for the full details and additional screenshots.
Download the latest prebuilt deb file and install via:
After install, fire up the control daemon:
And then run the tray application:
The latest version automatically add themselves to the session startup, so you won’t have to do any start script hacking to get the panel to load on every boot.
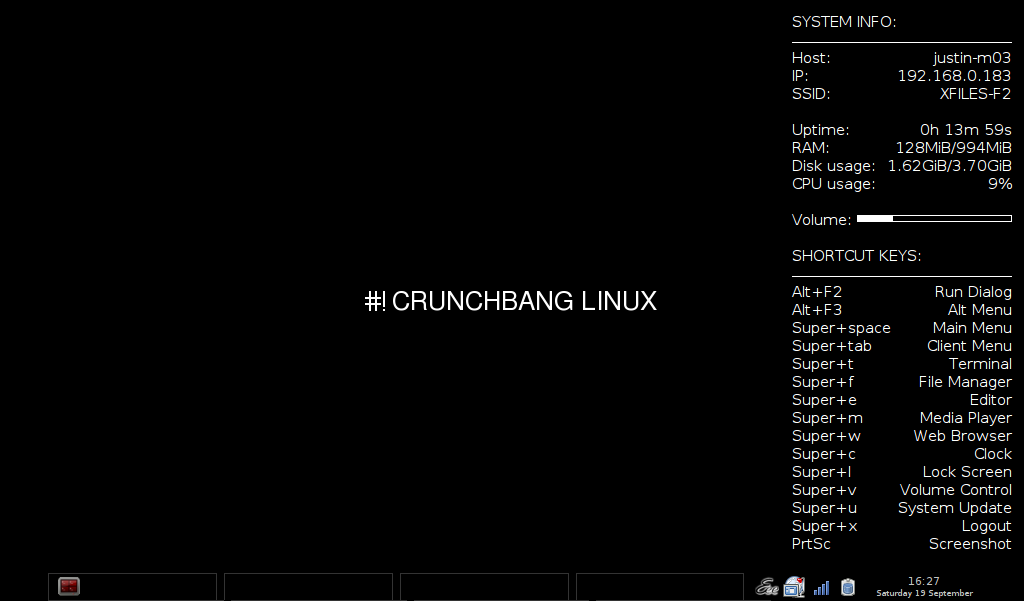
Tip #2: Add a volume hotkeys and feedback bar to conky
As you may have noticed from the screenshot above, I have a neat little volume bar indicator in my Conky system monitor desktop display. Thanks to bconner in the Crunchbang forums, adding hot keys for volume control is just a few edits away. For those unfamiliar with how to implement hotkey changes let’s walk through the steps.
Right click on the desktop and from the menu choose Preferences » Openbox Config » Edit rc.xml
Next, find the ending </keyboard> tag in the file (there is only one) and paste the following above it:
Save your file, right click on the desktop and from the menu choose Preferences » Openbox Config » Reconfigure. Again, right click on the desktop and from the menu choose Preferences » Openbox Config » Restart. Try out your original function hotkeys (FN + F8, FN + F9), they should be working fine.
Adding the volume bar to Conky works in a similar fashion. Right click and go to Preferences » Conky Config » Edit .conkyrc
In the text file, scroll down into the file and find a place you would like to output your volume bar (I put mine bellow the CPU usage). Once you find your spot, paste the following line:
Save the file. I found in most case Conky automatically reloads on save, but if it doesn’t simply right click and go to Preferences » Conky Config » Restart Conkey and your volume bar will appear. Try out your hotkeys, and you’ll see the bar move (I notice a slight delay, but it’s pretty slick regardless).
Conky offers a lot of customization. If you’re looking to do more, do have a read over their documentation.
For prosperity (and a backup for me), you can download my rc.xml and .conkyrc files for use or modification.
Tip #3: Rev up Firefox

Before you start hacking away on making Firefox fit more data on such a small screen, install Ubuntuzilla. Ubuntuzilla allows you to install the latest versions Firefox with ease on Ubuntu based installations. The installation instructions are very good no the aforementioned linked wiki so I’m not going to rehash the details. I upgraded to the latest 3.5 version before adding any extensions.
Once you are running the latest greatest, you could skip everything I’m about to say and simply use full screen mode. I’m not going to lie, when the only thing I’m doing is web surfing I surf in full screen mode.
What do I do? I start by stripping the chrome. Oddly, I generally do this to all my Firefox installs, mostly because I am not a heavy browser button guy. Keyboard shortcuts and mouse gestures. But back to the stripping of the chrome, all of which can be accomplished without a single line of code hacking (right click on a tool bar and choose Customize to start moving things around):
- Remove all buttons from the navigation bar.
- Move the address bar and the the search bar to the top menu bar.
- Hide the navigation and bookmarks bars.
- Hide the status bar.
Once the chrome is down to basically only the bare minimum, I install three primary add-ons:
- Tiny Menu: Combines all the top menu items into flyout submenus of a single entity called menu. A must have.
- Adblock Plus: Netbooks screens are small, and most ads are big. You do the math.
- Colorful Tabs: I found the tabs hard to separate from one another, so I added color.
With these three add-ons, I gain quite a bit of real estate. If you’re like me and always have a few permanent windows open, I highly recommend the Gina Trapani’s Icon-Only Perma-Tabs for Gmail and Google Reader collection (which I have running in the screenshot above).
Overall thoughts
I like #! a lot on the little Eee 901. It’s quick and snappy and doesn’t lag at all. In my unscientific timing tests, it takes about 26 seconds to boot to log in screen, and only once logged in only lives in about 100-110MB of RAM. With Firefox running I’m always at about 200MB (300MB if I’m running lots of tabs) but I still don’t experience the lag that was so bothersome as before with other operating system installs.
I thoroughly recommend that if you find yourself looking for just a little more speed on your Netbook, you might give CrunchBang a shot.