

Way back in the early 1990’s, my Dad built a portable drafting table for my brother, sister and I for use in school. Back then, we actually had a drafting class and you learned the basics with a pencil, a straight edge, and paper. This might seem like science fiction but I assure you this happened, in a public school no less. Shocking, I know.
Paper and pencil helped teach me the basics, but these days CAD and 3D modeling programs rule. Lasers that fit in my bathroom will happily take your 2D sketch and slice and dice. If you want 3D, 3D printers will extrude plastic to make your model come out. It’s fairly rapid, and with 3D printers getting ever so closer to being in the home, I decided I needed to to take those old school drafting skills and put them to use.
In a land of things, I need working parts
It’s no secret I’m spending my side hours working on robots and 3D printing software these days. I bought a couple 3D printers for the office, the Replicator 1 and 2 respectively, that we’re testing software and products designs on. But, in a land of Thingiverse objects, test prints, and prototypes, I actually wanted to design and print something of actual real world use. Enter my wife’s new car, the Honda Odyssey Touring Elite.
I already had a Galaxy Nexus charger mount from ProClip (which is fantastic), but I didn’t particularly like their arm mount I could buy for the new car. This I thought was a good chance to try this 3D printer out and print something useable. I was going to design a mounting plate. It sounded easy.
Never a straight line
The most logical place to put the mount was in a spot next to the steering wheel, above the vent, next to the center console. Problems however were immediately apparent:
- There was no lip to create a hook
- The surface had an uneven curvy pitched surface
- The vent had not so even inner shape
There are ways around these problems however. I could have made a simple mold of that part of the dash and worked backwards. I probably could have used an angle finder or some such tool. Heck, if some one would have let me use a 3D scanner, could have used that too. But what I had was my ever trusty calipers and patience, so that would have to do.
Using a pencil, I marked and measure each surface I could, from the inner vent edges to the forward face of the the dash. And having taken these measurements and drawn a rough sketch on paper, I now needed to turn that into 3D to print.
Paper to 2D to 3D
There are lots of tools out there. I honestly tried them all. Every single last one of them. I wrote code with OpenSCAD; not bad for my coder and math sensibilities, but I was looking for something more drafting like. I used FreeCAD and lots of commercial version trials and found the documentation so-so or the learning curve too steep for most. I was in the mood for instant gratification; I wanted to take measurements, draw it, and make it 3D. Where be it such a thing?
On recommendation, I tried Autodesk Inventor. Complex as all get out, but it seemed to make sense to me. In little less than an hour I had gone from drawing a 2D sketch to a 3D extruded part. No doubt someone with actual working knowledge could do it faster, but I had never used and was quite pleased.
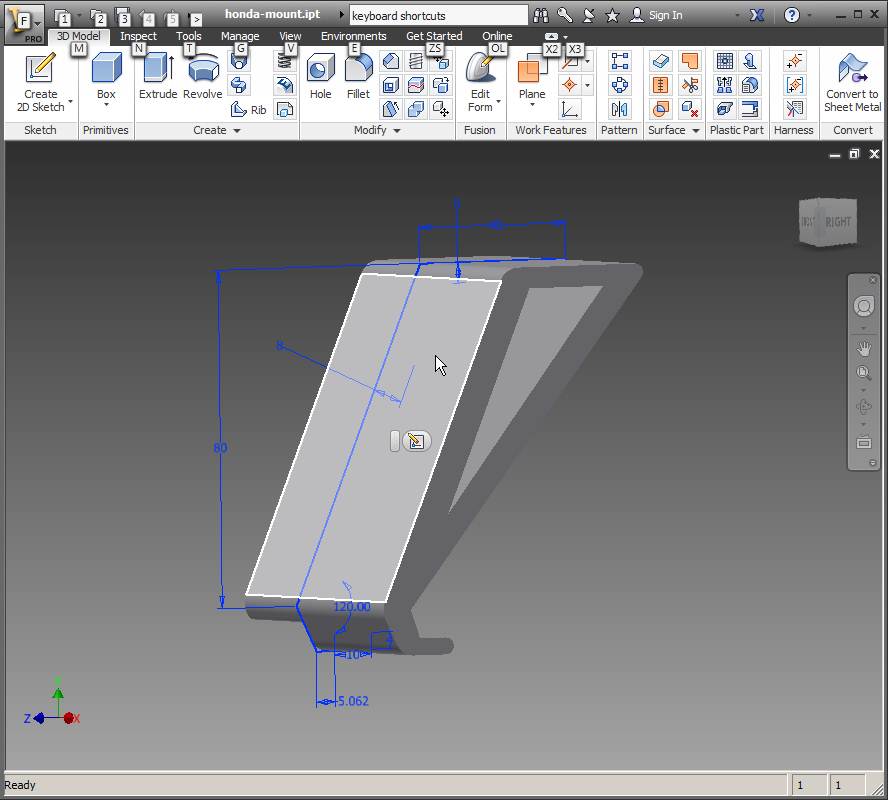
I’m not going to get into the finer details, but doing nothing more than taking a line drawing tools, entering in the measurements, and determining the angle based on those initial constraints is really that needed to be done. From there, I added fillets and and made sure the part met the depth I needed, and I export and STL.
Note, if you’re going to drop this into ReplicatorG, starting the model on the front plane would be as if you’re placing the object on the build plate. I didn’t know this, so I had to rotate and place the STL on the build plate later.
Printing the piece
I decided early on that I was going to use the Replicator 1 to print this piece. Said printer will print with ABS plastic and I knew that both 3M and Loctite had tapes that would bind well with ABS. Also, the Replicator 1 with the Sailfish firmware made printing both faster and more accurate and the results have just been better.
I ended up printing the item with a 5% infill, 3 extra shells, build plate at 115 C, extruder at 225 C. I actually printed the object twice, once on kapton tape (which when cleaned with acetone sticks very well) and also aluminum tape and hairspray (also a decent combo). Because the item is so tall, keeping the printer enclosed further helped make sure there was no curl or lift of the build plate.
Installing
After testing the fit, I marked and drilled pilot holes for the ProClip charger and then used self tapping screws that came with said charger to attach the plate. I then applied PowerGrab tape from Loctite to the under lip that hooks on the vent, as well as double stacked that back flat edge that touches the dash. I knew that I’d have some wiggle going into the left corner because of the slope, but with the tape thickness and it’s overall position, it was minimal.

The tape takes about 24 hours to really firm up. As with most things, if you pull hard enough you can rip it off the dash. In everyday use however, it’s proven sturdy and works a treat.
Why build it?
I posted the above install image on Google+ and got a lot of questions as to why I would build it and go to the trouble. Popular knowledge seems to think that just running out and buying something would be cheaper, quicker, or both.
I took it as a learning experience. I don’t spend my days inside CAD programs or 3D modelers, but it seemed interesting enough to learn. I’ve got a fair amount of time on the 3D printers at this point, so I knew I could get the quality and durability I needed. And further, I was able to teach my seven year old daughter how to use a pair of calipers. That’s a win in my book any day.