

When I alluded to the heat wave at the end of July as we started the great koi pond adventure, little did I know that my dim view of said events would travel into an ever worsening affair. The wildfires raging throughout California have been devastating, adding to the seemingly unbreakable heat and virus. The slowly falling ash drifting through a thick fog of smoke destroyed any resemblance of air quality. Working outside has became hazardous.
Luckily, we’ve been chipping away at collecting the various pieces of this puzzle to add together to at least get the system running. With a little elbow grease, a big piece of that puzzle is now complete: the bog filter.
Why a Bog Filter
A bog filter works in conjunction with the nitrogen cycle to keep your pond clean. Pond water is run through gravel substrate that if done correctly has an active bacteria community that breaks down the nitrogenous waste products such that the plants in said bog will then consume. The water is then returned to the pond crisp and clean.
In the smaller version of the pond we used an existing filter that Monica has had for a very long time and of which I cannot read the model label on at this point. We had planned to use it again in this build, but given the volume of water for both connected systems and having a little bit of dead space against the tortoise rehabilitation habitat we decided to try our hand at a bog filter.
Defining the Size
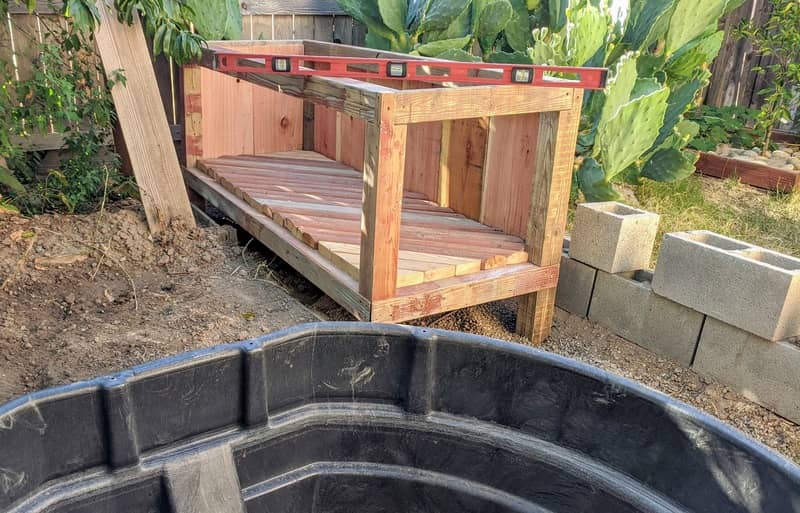
A bog filter doesn’t have to be large; most estimates put a bog size based on the volume of water you’re processing at just 10% of the total. In our case the size of the filter was based more on what reclaimed lumber and parts I had lying around that would handle the weight and pressure. As such, a lot of really twisted and questionable lumber was turned into a box that processes roughly 100 gallons of water give or take (which in the case of our 550 gallon pond is more than sufficient).
Side Note: beyond volume of water, you’re want to take into account how many fish you’re putting into your system as well. We’re not overstocking this system with fish (and you shouldn’t overpopulate yours either, it’ll just go bad).

At 6ft by 2.5ft by 2ft, it’s neither small nor light, but the inner shell is also backfilled with styrofoam under the liner to give us a little false bottom. The base shell was built and then moved into place and leveled, and then finished out.
Adding the bulkheads
A bog filter with no input/output isn’t exactly helpful obviously, so we we need water-tight mechanism to handle this for us. Enter bulkheads.
Bulkheads are one of those things that if you’re into aquariums or any other water-tank setup you are probably familiar with. They’re just a fitting that allows you to seal against a wall with a gasket such that water won’t leak.
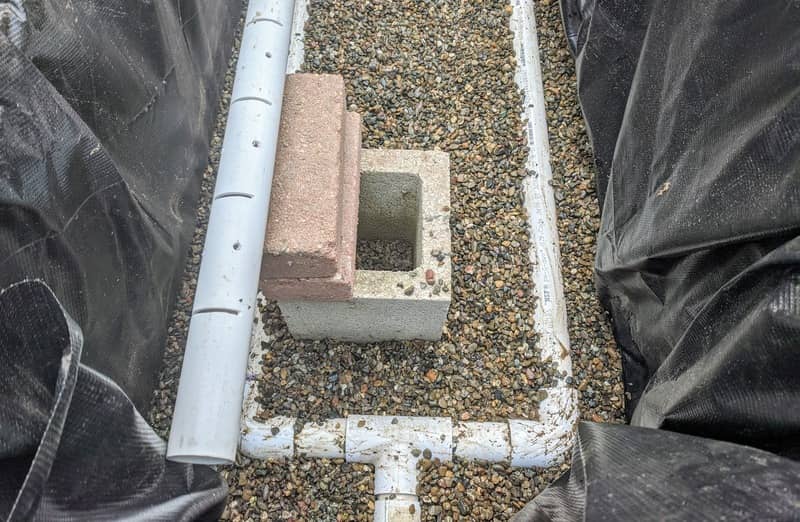
I didn’t have any bulkheads lying around, but settled on 1.5 inch FPT fittings (which the version I bought have an OD of about 2.25 inches). I broke out the hole saw and cut three specific holes:
- one lower input from the pond pump
- one higher output back to the pond
- one higher emergency output to handle high flow or rain (which we may never see again in California given the current luck we’re having).
The bulkheads came with a gasket, but a quick test found them somewhat lackluster in application (which is largely my fault given the play in the lumber and liner). To help, I sealed said bulkheads with waterproof PVC that was designed to work with the pond liner. This in conjunction with the inner gasket which gave us a leak proof fit.
Flowing Water Upwards
For the inner water flow, we want water to travel up through our rock layer, let the plants take the nutrients, and then let gravity do the work of returning the water to the pond via an incline.
To handle this the bottom input was a forked 1.5 inch lead with lower slots cut with my miter saw (which really speeds things up and cuts SCH40 PVC like butter). I spaced the blade width cuts every 4 inches along a 5 foot run of pipe and the glued up and connected with a to the fitting. The upper returns also used a similar approach.
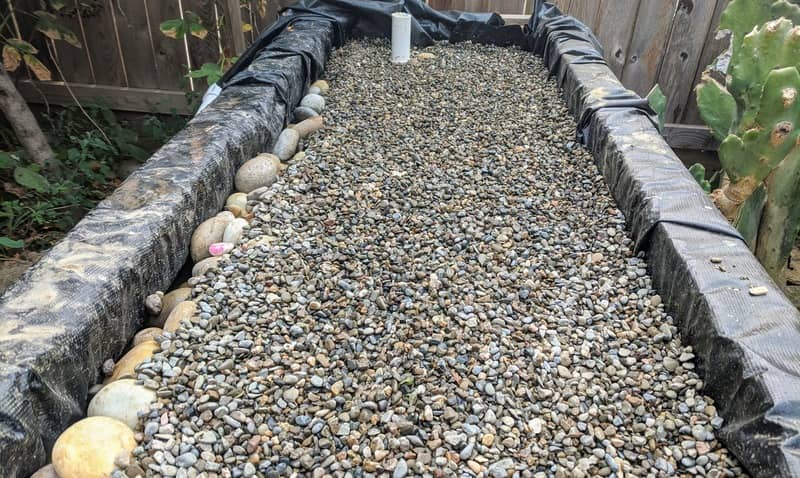
The filler rock was a mix of pea gravel sizes that we had on hand, which while on the smallish side are smooth which makes it easy to work with. For the return pipes, we did cover with larger rock to make sure we could prevent clogging.

Finally, the top layer of pea gravel was put into place allowing for a water line 2 to 3 inches below that surface. This is somewhat flexible depending on pump configuration (which I’ll cover in another post).
Missing a Step
In the process of fitting up the box after the final leveling, I forgot the inner support structure on one side of the bog filter. This may seem inconsequential but given the forces at play missing a support that distributes load is a recipe for disaster. How does one forget a key part?
Extreme heat plays tricks on the mind and at 112 degrees F that day with smoke filled air I was not working with a clear state of mind. I shouldn’t have been working on the box, plain and simple. This was a terrible and unhealthy idea.
As such my test fill to verify the level and settle of the box ended in a huge cascade of failure, blowing out one side of the box in a sound that was loud enough everyone the house ran outside to see what had happened.
Said failure makes for a funny picture now but at the time, I was rather angry and embarrassed at the foolish mistake I had made. The support cross members sat on my bench as if laughing at me. Luckily the liner was okay and nothing was in broken beyond the facia bottom edge boards.
The moral of the story is don’t rush the work and don’t work through 112 F heat. In the smoke. During a pandemic that attacks the respiratory system. I was stupid. Don’t be me.
Wrapping Up
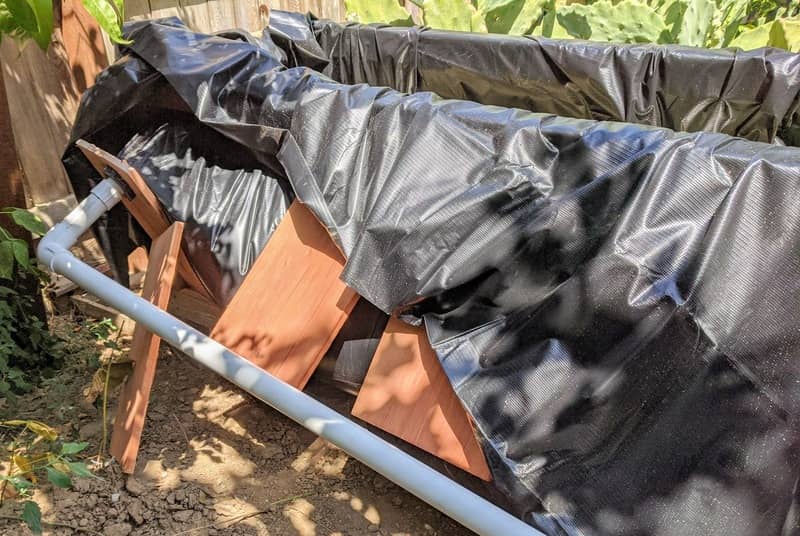
With the basic bog setup and the test run having run for a week without issues, it was time to do some additional waterproofing (which given the bulk of the lumber being pressure and outdoor treated, was more look than anything else), cut down the liner, and put on the end caps.
In our installment next week, we’ll take a look at the pumping water through the bog and challenges of finding parts during a pandemic.